jliltd
Active Member
Bass fishermen like the little sparklies in the paint used on their boats. Most geek pilots (incriminating myself) like all sorts of little flashy displays and things to take care of their ADD during cruise. ADD types tend to have a good scan. But when the opportunity presents itself to fully defend a new panel gizmo purchase put me first in line.
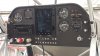
I ordered a Sandia Quattro SAI 340 exactly one year ago from ACS and it had been on backorder until two weeks ago. The project I had originally intended to use the Quattro unit in is long gone. So I bought a Husky a month ago that had one vacuum instrument, an RCA attitude indicator. In light of the FAA's recent policy of allowing the replacement of a vacuum AI with a solid-state TSO'd digital horizon being only a "minor mod", I started thinking about the weight savings and reliability advantages of following the FAA's new guidelines. Plus, "I had me one" in the box. So what the heck? Here are two photos providing a quick summary of the before and after, in case anybody doesn't want to read anymore of my installation details down below (I can, at times, be a real blow hard):

ORIGINAL PANEL

NEW PANEL
The Quattro is designed to fit right into a standard 3 1/8" instrument hole, directly replacing the original AI. This is also a condition of the FAA policy to deem this a minor modification with logbook entry. You can't change instrument locations. No problem here for me. The Quattro also has an internal Lithium battery that provides for a completely redundant power source to keep the unit alive for 2 hours or better (depending on brightness settings). This backup power is another condition of the FAA's vacuum replacement approval.
I commenced by removing the original vacuum gyro and associated hoses, filters and regulator. I also removed the vacuum pump and installed the Lycoming parts called out to properly blank out the accessory case vacuum pad, including removal of the internal gear and insertion of a Lycoming plug eliminating the gear all together. That's normal engine stuff so I will stick to the Husky panel work henceforth.
I then pulled the shock-mounted instrument sub panel to facilitate a proper installation. There are only three things required for a typical Quattro install. Electrical install (+/- with new 2 amp breaker), tee into the pitot pressure line, and tee into the static instrument line. Here are a couple of photos of the unboxed unit being fit from in front of and from behind the panel on the bench.


Those of you with a keen eye might notice an issue here and you would be right. Two of the original panel shock mounts and associated acorn nuts are very close to the AI cut-out and interfere with the two upper corners on the Quattro unit. Here's what it looks like from above:
So to correct the problem I procured a few female/male rubber shock mounts rather than the original male/male rubber mounts. I went with natural rubber with a 8-32 threads (same size threads as original).

SHOCK MOUNT COMPARISON
I then countersunk the two interfering mount hole locations on the front of the removed sub-panel and substituted the newly procured female/male rubber mounts at those locations so that the instrument mounting screws could be installed flush through the panel and into the mount and not interfere with the Quattro's corners. Here is a photo of the two new rubber mounts with countersunk instrument screws for the panel temporarily put in place back in the airplane:

I removed the original Bose Interface circuit breaker and associated system and replaced it with a new Klixon 2 Amp circuit breaker for the Quattro. I labeled the breaker "EFIS" for lack of a better idea. Perhaps PFD would be better. No guidance in the Sandia documentation for that but I think I'm good with EFIS. A couple of 24AWG wires (from breaker and to ground) and the mechanical install is done.
I used the Quattro unit's built-in set-up menu and the POH, TC data and panel markings to set the various speed values to match the aircraft and range marking (currently the unit requires a conversion of the POH numbers to knots for speed arc programming -- more on this later). A little logbook work and Bob's your uncle:

FINAL RESULT
On first power-up the unit had about a minute of boot time and alignment and then showed a 10 degree nose up 3-point attitude (with 26" mains and a Baby Bushwheel). A buddy and I lifted the tail to level and the indicator bar came right in line with the horizon. Really cool.
The unit feels solid and is well made. As well it should having been vetted by the FAA for two years. Truly unbelievable that at a weight of 0.8 lb and depth of less than 3" the device can take the place of a whole vacuum system. The barometer setting knob has a hardy feel and with a tap it also controls screen brightness. It was time to test things and so I put my good friend and fellow T-Hangar Mafia member, Dennis the Enforcer, in the front seat:

SINGLE KNOB
In flight the Quattro responds really well and has an instantaneous fluid flow. The little slip ball depiction is dead on with the mechanical ball in turns and skids.

BANK
The altimeter and airspeed settings read directly in line with the original analog instruments.
There is one annoying anomaly. The Quattro in it's current software level only displays speed in knots and has no provision to change units to miles per hour. That's kind of odd. Don't get me wrong. I like knots. In a perfect world we would all use knots instead of mph. But my Husky has all it's values given in the POH, TCDS and instrument marking and placards expressed in miles per hour. On my first approach I looked at the speed tape and saw a speed of 47. Even though I consciously knew it was knots I almost soiled myself as I am more used to the 55 mph value and would be stalled if it were 47 mph. Sheesh, who wants to do math on final? So this unit thing will probably have me reverting to the original ASI and ignoring the digital tape during approach. Where's the fun in that? I think Sandia is going to provide a units option in future software updates and in emails with the factory they have had some internal discussions so far. In my opinion if I were the FAA I would mandate this as there are so many aircraft with certified speeds specified in the POH, placards, markings and TC's in miles per hour it could lead to trouble. I know that the FAA mandates two different placards in certain models of aircraft (like Cherokees and Cessna 180's) based on serial number depending on whether they are older (mph) or newer (knots) and the two cannot ever interchange. Similar reasoning should apply here. I used to be a production DER and designer and could see an airworthiness requirement to have units match the POH at a minimum.
Every 5 years the battery pack needs to be replace with an OEM unit at the cost of around $150. The ICA's provide for a capacity test to be run every 2 years to ensure the battery is ready for an emergency backup event.
All in all it has been deeply satisfying removing a vacuum system of historically spotty reliability and replacing it with a neat little mini EFIS type display. And it takes care of my sparkle-paint, flashy gizmo ADD all in one.
I will install two more units. One in a Piper Comanche (with Aspen primary display) and a Cessna 180 (with King electric HSI unit), eliminating the vacuum systems for each of those.
Jim
P.S. The SAI 340 Quattro was this month's Aviation Consumer's best bang for the buck pick for a solid-state AI replacement.
I ordered a Sandia Quattro SAI 340 exactly one year ago from ACS and it had been on backorder until two weeks ago. The project I had originally intended to use the Quattro unit in is long gone. So I bought a Husky a month ago that had one vacuum instrument, an RCA attitude indicator. In light of the FAA's recent policy of allowing the replacement of a vacuum AI with a solid-state TSO'd digital horizon being only a "minor mod", I started thinking about the weight savings and reliability advantages of following the FAA's new guidelines. Plus, "I had me one" in the box. So what the heck? Here are two photos providing a quick summary of the before and after, in case anybody doesn't want to read anymore of my installation details down below (I can, at times, be a real blow hard):
ORIGINAL PANEL
NEW PANEL
The Quattro is designed to fit right into a standard 3 1/8" instrument hole, directly replacing the original AI. This is also a condition of the FAA policy to deem this a minor modification with logbook entry. You can't change instrument locations. No problem here for me. The Quattro also has an internal Lithium battery that provides for a completely redundant power source to keep the unit alive for 2 hours or better (depending on brightness settings). This backup power is another condition of the FAA's vacuum replacement approval.
I commenced by removing the original vacuum gyro and associated hoses, filters and regulator. I also removed the vacuum pump and installed the Lycoming parts called out to properly blank out the accessory case vacuum pad, including removal of the internal gear and insertion of a Lycoming plug eliminating the gear all together. That's normal engine stuff so I will stick to the Husky panel work henceforth.
I then pulled the shock-mounted instrument sub panel to facilitate a proper installation. There are only three things required for a typical Quattro install. Electrical install (+/- with new 2 amp breaker), tee into the pitot pressure line, and tee into the static instrument line. Here are a couple of photos of the unboxed unit being fit from in front of and from behind the panel on the bench.
Those of you with a keen eye might notice an issue here and you would be right. Two of the original panel shock mounts and associated acorn nuts are very close to the AI cut-out and interfere with the two upper corners on the Quattro unit. Here's what it looks like from above:
So to correct the problem I procured a few female/male rubber shock mounts rather than the original male/male rubber mounts. I went with natural rubber with a 8-32 threads (same size threads as original).
SHOCK MOUNT COMPARISON
I then countersunk the two interfering mount hole locations on the front of the removed sub-panel and substituted the newly procured female/male rubber mounts at those locations so that the instrument mounting screws could be installed flush through the panel and into the mount and not interfere with the Quattro's corners. Here is a photo of the two new rubber mounts with countersunk instrument screws for the panel temporarily put in place back in the airplane:
I removed the original Bose Interface circuit breaker and associated system and replaced it with a new Klixon 2 Amp circuit breaker for the Quattro. I labeled the breaker "EFIS" for lack of a better idea. Perhaps PFD would be better. No guidance in the Sandia documentation for that but I think I'm good with EFIS. A couple of 24AWG wires (from breaker and to ground) and the mechanical install is done.
I used the Quattro unit's built-in set-up menu and the POH, TC data and panel markings to set the various speed values to match the aircraft and range marking (currently the unit requires a conversion of the POH numbers to knots for speed arc programming -- more on this later). A little logbook work and Bob's your uncle:
FINAL RESULT
On first power-up the unit had about a minute of boot time and alignment and then showed a 10 degree nose up 3-point attitude (with 26" mains and a Baby Bushwheel). A buddy and I lifted the tail to level and the indicator bar came right in line with the horizon. Really cool.
The unit feels solid and is well made. As well it should having been vetted by the FAA for two years. Truly unbelievable that at a weight of 0.8 lb and depth of less than 3" the device can take the place of a whole vacuum system. The barometer setting knob has a hardy feel and with a tap it also controls screen brightness. It was time to test things and so I put my good friend and fellow T-Hangar Mafia member, Dennis the Enforcer, in the front seat:
SINGLE KNOB
In flight the Quattro responds really well and has an instantaneous fluid flow. The little slip ball depiction is dead on with the mechanical ball in turns and skids.
BANK
The altimeter and airspeed settings read directly in line with the original analog instruments.
There is one annoying anomaly. The Quattro in it's current software level only displays speed in knots and has no provision to change units to miles per hour. That's kind of odd. Don't get me wrong. I like knots. In a perfect world we would all use knots instead of mph. But my Husky has all it's values given in the POH, TCDS and instrument marking and placards expressed in miles per hour. On my first approach I looked at the speed tape and saw a speed of 47. Even though I consciously knew it was knots I almost soiled myself as I am more used to the 55 mph value and would be stalled if it were 47 mph. Sheesh, who wants to do math on final? So this unit thing will probably have me reverting to the original ASI and ignoring the digital tape during approach. Where's the fun in that? I think Sandia is going to provide a units option in future software updates and in emails with the factory they have had some internal discussions so far. In my opinion if I were the FAA I would mandate this as there are so many aircraft with certified speeds specified in the POH, placards, markings and TC's in miles per hour it could lead to trouble. I know that the FAA mandates two different placards in certain models of aircraft (like Cherokees and Cessna 180's) based on serial number depending on whether they are older (mph) or newer (knots) and the two cannot ever interchange. Similar reasoning should apply here. I used to be a production DER and designer and could see an airworthiness requirement to have units match the POH at a minimum.
Every 5 years the battery pack needs to be replace with an OEM unit at the cost of around $150. The ICA's provide for a capacity test to be run every 2 years to ensure the battery is ready for an emergency backup event.
All in all it has been deeply satisfying removing a vacuum system of historically spotty reliability and replacing it with a neat little mini EFIS type display. And it takes care of my sparkle-paint, flashy gizmo ADD all in one.
I will install two more units. One in a Piper Comanche (with Aspen primary display) and a Cessna 180 (with King electric HSI unit), eliminating the vacuum systems for each of those.
Jim
P.S. The SAI 340 Quattro was this month's Aviation Consumer's best bang for the buck pick for a solid-state AI replacement.
Last edited:
") wink
wink